
Having the ability to control time of day in X-Plane is a fun and helpful feature. It took a lot of research to figure this out, so I thought it would be a great first step in using ArdsimX in a fun way. In my sim, I find it more fun to fly at sunrise or sunset, as it’s a better experience overall. Things tend to look more real I guess.
This tutorial will cover the use of encoders and funky use of datarefs to maximize your control of X-Plane 11. With a quick adjustment via a potentiometer. You can change it on the fly without having to go back to the flight setup menu. You could also do this in the joystick settings, but I like having a knob on my panel to adjust time of day.
Step 1: Gather Materials
(1x) Arduino Uno
(1x) 10K Potentiometer
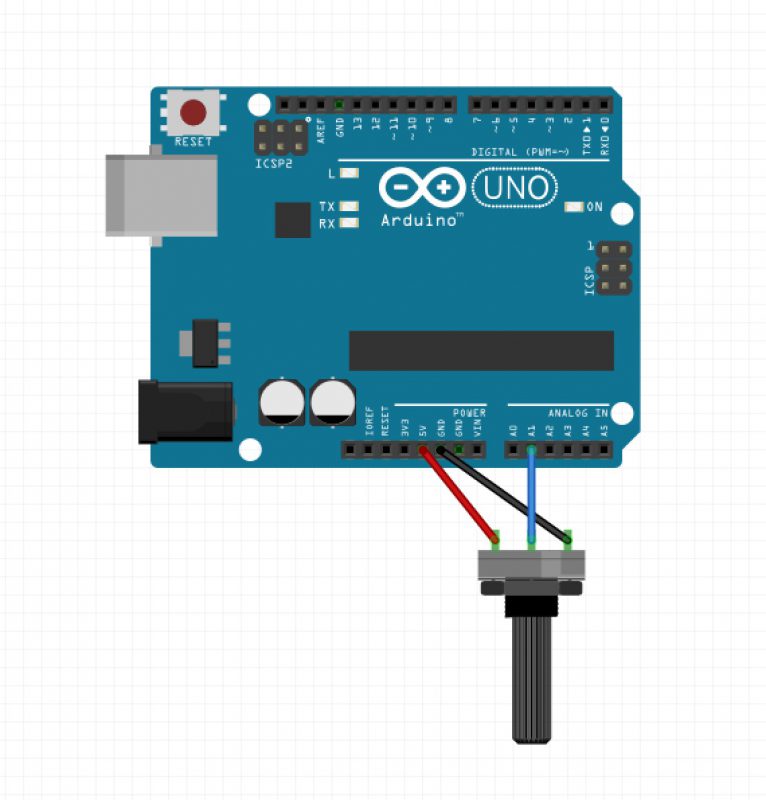
Step 2: Wire up your parts
Connect the pot as normal to the Arduino. Connect outer pins to GND and +5V and the center pin to one of the analog inputs, I’m using Analog Input #1 (A1). Here’s a picture of my setup.

Plus the Fritzing version:
Step 3: Find Dataref and write your config file.
I first found the Dataref to use using the Dataref plugin viewer. Read my info on Datarefs here for more info. Using this, I filtered for Time based Datarefs, screenshot below.

I chose to use sim/time/zulu_time_sec Dataref. I used the dataref for zulu time, but you can also use sim/time/local/time/sec for this purpose. Here’s how I set it up below. Don’t forget to hit ‘reconnect’ to load any changes into ArdsimX.
————-Copy code below and save as data.cfg in your ArdsimX Plugin Folder——————–
@ ================= INFO =================

Board #1 - Arduino (USB) -------------------------------------------------------

---- Analog pins: ----
1 - Time of Day

@ ================= CONFIG =================

*1-1Ui
[I]
A1 sim/time/zulu_time_sec 86399,0 1 100 0 86399
Let’s break down line 12: A1 sim/time/zulu_time_sec 86399,0 1 100 0 86399
- A1 = Analog input #1
- sim/time/zulu_time_sec = Dataref used
- 86399, 0 is the number of seconds per day. 24 hours X 60 minutes X 60 seconds = 86,399 if counting from 0.
- 1 refers to the first trim setting (there’s only one). Some datarefs, like lights have many options.
- 100 is the input sensitivity. This is value the pot needs to move before a change occurs.
- 0 86399 are set as the mix/max values.
Step 4: Upload your Ardsimx code to your Uno.
There is no modification needed for the ArdsimX Arduino code upload. Use the standard ArdsimX Arduino upload for your setup, be sure to configure for USB or LAN use. If all goes well, you should have control over time in X-Plane.
To take this control further, try applying additional pots to various controls, like cloud tops/bottoms, or rain to take more god-like control over X-Plane weather. Try this [O] config setting for starters. The various cloud base layers will all rise up and down based on your pot setting. Set X-Plane weather to ‘Broken’ to see good results.
A1 sim/weather/cloud_base_msl_m[0] 0,10000 1 100 0 10000
I hope this helps get you started with some thinking of how to use ArdsimX in other ways. Post a comment with any questions or notes if this isn’t clear.